Main navigation
eSIM stuck on activating? Here's why it happens and how to fix it
If you’ve been staring at the spinning “Activating” wheel, you can hold off on planning your phone’s funeral because the explanation is usually less dramatic than a broken device or a dead eSIM. Usually, the fix is quick, though some cases might take more effort. Read on to find out what to do when your eSIM is stuck on “Activating.”


Table of Contents
Is it normal that my eSIM is stuck on “Activating”? Check this first
The short answer is “Yes!” But don’t think of it in terms of “stuck,” since it can easily look scarier than the actual fix. Let’s dive into the most common reasons why your eSIM activation might get caught in a loop.
Trying to activate the eSIM before arriving at the destination. Activating a travel eSIM from home fails because it’s missing the local network required to finish the setup.
Outdated iOS/Android. The architecture of an eSIM relies heavily on the software side, and not having it updated might result in glitches and delays.
Lack of internet connection. If your signal is weak or you’re on unstable, public Wi-Fi, the security “handshake” will time out, leaving you on “Activating.”
Skipped procedure steps. Activating an eSIM while dealing with luggage and navigating a crowded airport is a recipe for distraction. Miss a tiny installation prompt, and the setup gets stuck.
Quick fixes: How to fix an eSIM stuck on “Activating”
Before you lose a staring contest with your screen and declare the whole trip cursed, try these quick fixes:
Turn airplane mode on and off. It’s a classic step you shouldn’t skip, and it can kickstart a stalled installation. Toggle airplane mode on and wait 30 seconds before toggling it back off?
Restart your device. This helps refresh the network connection. Turn your phone completely off for 30 seconds, and then turn it back on.
Check for software updates. An outdated system can cause glitches. You can check this using the following steps:
Go to your “Settings.”
Tap “General.”
Tap “Software update.”
Check your internet connection. Your eSIM needs a stable internet connection to activate properly. Connect to stable and reliable Wi-Fi and turn off your VPN or iCloud Private Relay.
Toggle the eSIM line off and on. Sometimes communication between your phone and the network gets stuck, and this can help refresh it:
Go to “Settings.”
Look for “Cellular” or “Mobile service.”
Tap your eSIM and toggle the switch off and then back on.
Enable data roaming. Your international travel eSIM may not work as expected unless data roaming is turned on.
Go to “Settings.”
Look for “Cellular” or “Mobile service.”
Tap your eSIM line and toggle the “Data roaming” switch to “On.”
Update carrier settings. Your phone uses carrier settings to connect to local networks. If they’re outdated, your eSIM might get stuck trying to authenticate.
Connect to Wi-Fi.
Go to “Settings.”
Tap “General.”
Look for “About” and wait for about 20 seconds. If you see a pop-up with “Carrier settings update,” hit “Update.” If no message pops up, it means your phone is up to date.
Set the date and time to automatic. Your phone’s clock should match the network time, because if there’s a time mismatch, the activation request gets blocked.
Go to “Settings.”
Tap “General.”
Tap “Date & time.”
Toggle the switch to “Set automatically.”
Reset network settings. It flushes out old network configurations that could be blocking your eSIM’s connection to local towers.
Go to “Settings.”
Tap “General.”
Select “Transfer or reset iPhone.”
Tap “Reset.”
Hit “Reset network settings” and enter your passcode.
What to do if your eSIM is still stuck on “Activating”
If you’re stuck with an eSIM not working on an iPhone even after the basic troubleshooting steps, most often than not, the problem is usually a hidden security wall or a data mismatch between your device and the network. Have a look at some of the more complex possible issues:
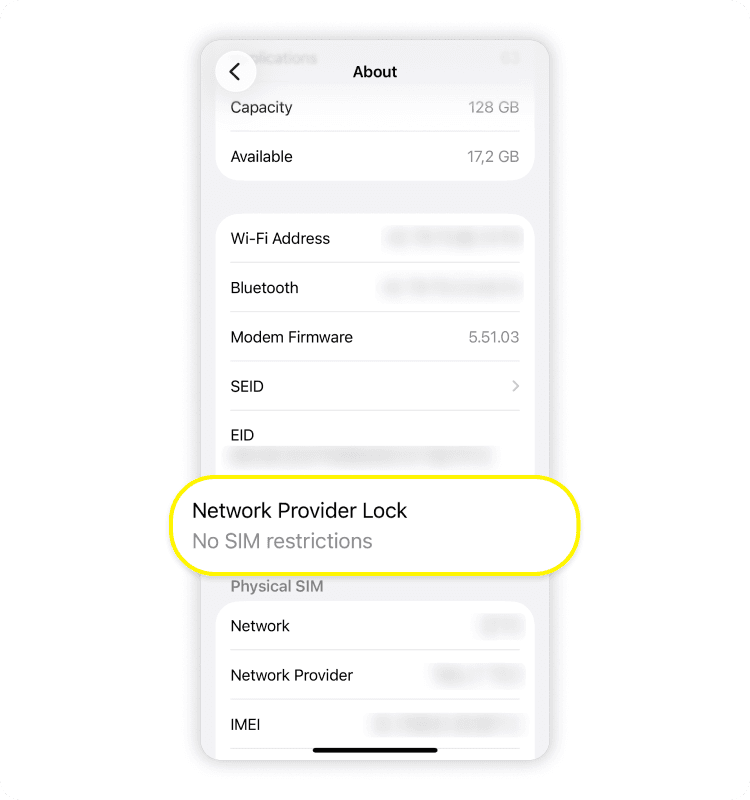
Your phone is carrier locked. If your phone is still locked to your home provider, it won’t accept a SIM or eSIM from another network, so the setup simply won’t complete. Here’s how to check:
Go to “Settings.”
Tap “General.”
Tap “About.”
Look for “Network provider lock.”
If you see “No SIM restrictions,” it means your phone is unlocked. However, if you see “SIM locked” or a list with carrier names, your phone is carrier locked.
Device compatibility. Your device must be an iPhone XR, iPhone XS, or newer model to support eSIM tech. If you’re not sure, you can always check your provider’s list of eSIM supported devices before purchasing a plan.
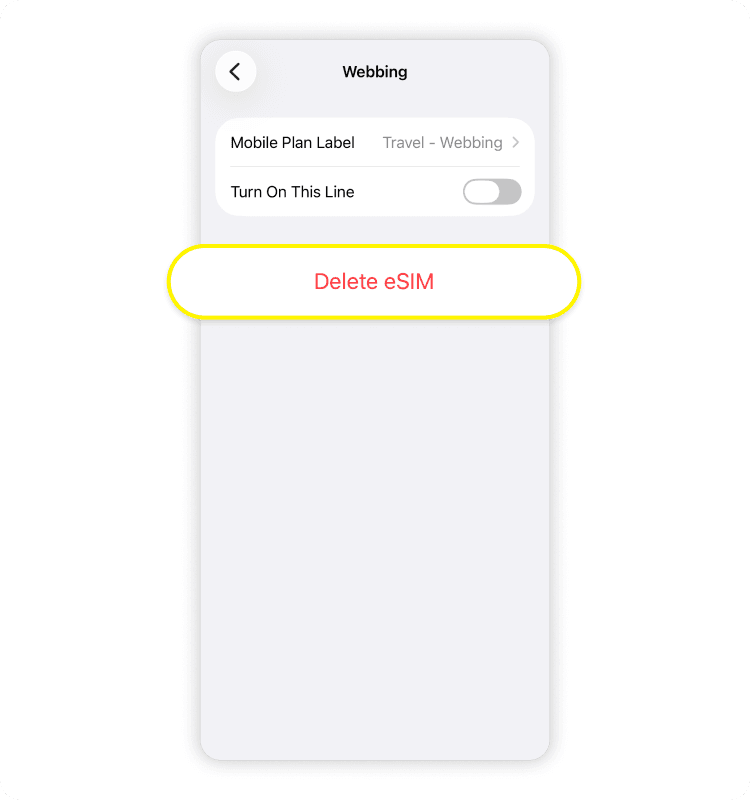
Conflicting eSIM profiles. Leftover profiles from old trips can confuse your phone’s network manager, freezing your screen on “Activating.” Here’s what to do to remove them:
Go to “Settings.”
Look for “Cellular” or “Mobile service.”
Tap on the old eSIM line under the list.
Scroll to the bottom and tap “Delete plan” or “Delete eSIM.”
Remove and re-add the eSIM
If you’re considering deleting your eSIM, check your provider’s policy first. Most eSIM QR codes can only be scanned once, so deleting the profile could mean you’ll have to contact customer support for a replacement.
However, Saily’s eSIM app is a more forgiving choice — it allows you to re-download and reinstall the eSIM profile straight from the app. If you need a quick refresher, you can always check out our full guide for how to install eSIM on an iPhone.
Go to “Settings.”
Look for “Cellular” or “Mobile service.”
Select your eSIM and tap “Delete plan” or “Delete eSIM.”
Jump back over to the Saily app.
Tap on your eSIM and press “Install eSIM.”
eSIM stuck on “Activating” on Android
To all the Android users out there, don’t worry — these tips apply to you too! When it comes to how to install an eSIM on your Android, watch out for the same hiccups: Setting it up before you arrive, having no internet, or running outdated software.
While the settings menu can look a bit different depending on your phone, these simple fixes are the same. Try toggling airplane mode on, restarting your phone, enabling data roaming, or checking your APN settings. Clearing the Google Carrier Services cache can also solve the problem — here’s how to do it on your Android:
Go to “Settings.”
Tap “Apps.”
Look for “Carrier services.”
Tap “Storage.”
Tap “Clear cache.”
When to contact your eSIM provider
If none of the troubleshooting steps have worked, it’s probably time to contact your eSIM provider for more help. Before you reach out, you can speed up the process by doing a quick pre-check: Make sure to check if your eSIM is activated and check if your device is unlocked. You should also confirm your iOS or Android version is up to date, that data roaming is enabled, and that your phone is compatible with an eSIM. Most importantly, don’t delete the eSIM before contacting support.

Stay connected with the Saily eSIM app
Affordable mobile data plans for every journey.
FAQ
eSIM activation takes a few seconds to a few minutes. However, in some cases, it may take longer depending on the carrier and network conditions. If it’s taking longer than 15-20 minutes after you have already arrived at your destination, it’s a good idea to try the troubleshooting steps mentioned above.
Yes. Most travel eSIMS only fully activate once you arrive at your destination and connect to a supported network. It’s still a good idea to install your eSIM before your trip, but don’t be surprised when your screen shows “Activating,” because this is completely normal.
Your eSIM may show “Activating” with no service because it hasn’t connected to a supported network yet. This is common with travel eSIMs, especially before you arrive at your destination. In many cases, you can help it connect by turning airplane mode on and off, restarting your phone, enabling data roaming, or setting your phone’s network selection to “Automatic.”
It depends on the provider. Some eSIMs can only be activated once, while others, like Saily’s, allow you to reinstall the eSIM through the app. If unsure, it’s best to check your provider’s policy before removing your eSIM.
If your phone is locked to a carrier, it most likely won’t work with a travel eSIM from a different provider. Even though it’s an eSIM and not a physical card, the carrier lock still applies to the phone itself. The good news is you can quickly check if your iPhone is unlocked to be sure.

Your journey, uninterrupted
Explore the world with a Saily eSIM — browse wherever, whenever.

Related articles