


Siamo spiacenti, ma questo articolo non è ancora disponibile nella lingua desiderata.
How to set up an eSIM on the Apple Watch
The Apple Watch isn’t just a piece of technology strapped to your wrist. For many, it’s a running partner, a quiet nudge to stand after hours at a desk, or the device that lets you call for help in a moment of need. Now imagine it unshackled from your iPhone: calls, music, notifications — all on your wrist, even when your phone is nowhere near. This guide shows how to set up an Apple Watch eSIM, which models support it, and why this feature can change how you move through your day.

Indice
What is an eSIM for the Apple Watch and what does it let you do?
An eSIM (short for embedded SIM) is a cellular chip built into your Apple Watch that connects it to your carrier’s cellular network. There’s no tiny SIM card to insert or tray to open, just a digital connection ready to be activated.
With cellular service enabled, your watch becomes much more than a companion device, allowing you to:
Take calls and send messages without your iPhone.
Get notifications on your wrist while your phone charges in another room.
Stream your running playlist or a podcast on a long walk (speaker playback for streamed audio works only on the Apple Watch Series 10 and Ultra 2).
Pay for coffee with Apple Pay when your hands are full and your phone’s at home.
Picture yourself walking through your neighborhood. Your iPhone has stayed behind at home, but a call from your boss lights up your wrist. You don’t even break stride — you flick your wrist, dismissing the notification like it’s a stray leaf in your path. Or you’re at the farmers market, holding bags of produce, and pay with a tap of your watch. It feels natural, almost invisible, as if the tech has stepped out of the way while still keeping you connected.
How to check if your Apple Watch is eSIM compatible
Not all Apple Watch models are created equal when it comes to staying connected. Only certain models offer cellular connectivity through an eSIM. Here’s how to know if yours makes the cut:
Apple Watch Series 3 (2017) and later: Only GPS + Cellular models have eSIM.
Apple Watch SE (2020 and later): GPS + Cellular versions are ready.
Apple Watch Ultra and Ultra 2: All models come with eSIM support.
Series 1 and 2: No cellular capability.
On an Apple Watch running watchOS 10 or later, press the side button to open the control center and look for a cellular button on the screen. If you’re using an older version of watchOS, swipe up from the bottom of the watch face instead. For a quick visual check, some models (like the original Apple Watch SE and Series 3 GPS + Cellular) feature a distinctive red dot or ring on the digital crown, a subtle detail that signals your watch is ready for cellular service.
How to activate an eSIM on your Apple Watch
Before going through the steps of setting up an eSIM on your Apple Watch, let’s talk about what you need to have ready. This process isn’t complicated, but it does require a few essentials:
An eSIM-compatible iPhone running the latest version of iOS.
An Apple Watch (Series 3 or later, or an Apple Watch Ultra) with GPS + Cellular capability.
A carrier plan that supports eSIM activation for Apple Watch.
It’s also worth making sure your iPhone already has its eSIM working properly. If you’re unsure, check out our guide on how to install an eSIM on an iPhone for a quick refresher. A solid iPhone setup lays the groundwork for getting your watch connected too.
Now let’s walk through the setup process step by step.
Step 1: Pairing your Apple Watch with an iPhone
Pairing your Apple Watch to your iPhone is the first step in unlocking its cellular power.
Open the Apple Watch app on your iPhone.
Tap start pairing and align your watch in the camera viewfinder if prompted.
Choose whether to restore from a backup or set up as a new watch.
If you’re wondering whether your iPhone’s eSIM is active and ready to pair — check if an eSIM is activated on your iPhone. Having this information will ease your way moving forward.
Once paired, your Apple Watch is connected to your iPhone and ready for cellular setup.
Step 2: Set up Cellular Data on your Apple Watch
This is where the magic happens — your watch becomes independent from your phone.
In the Apple Watch app, go to the “My watch” tab and tap “Cellular” or “Mobile service."
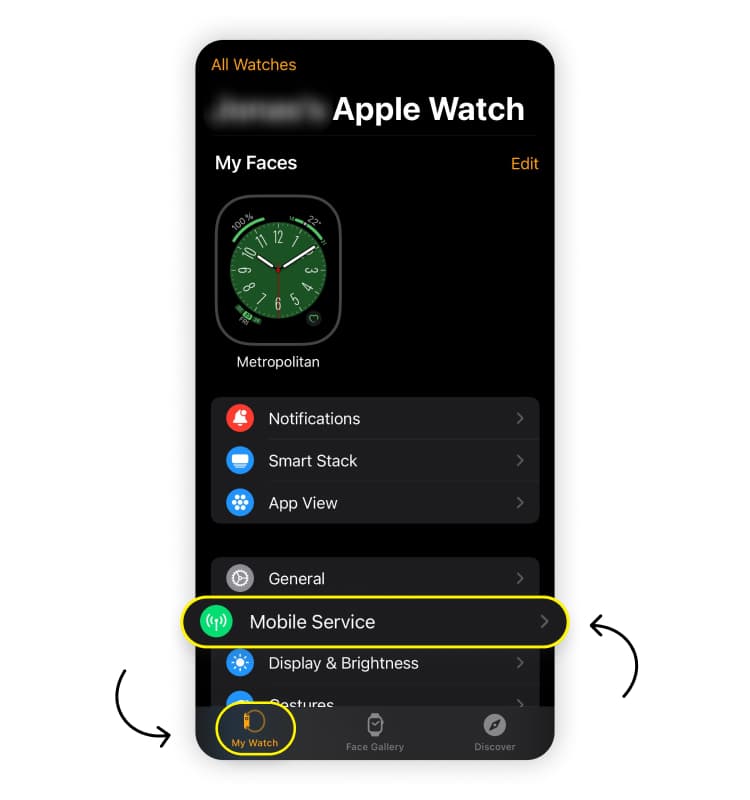
Tap “Set up cellular” or “Set up mobile service.”
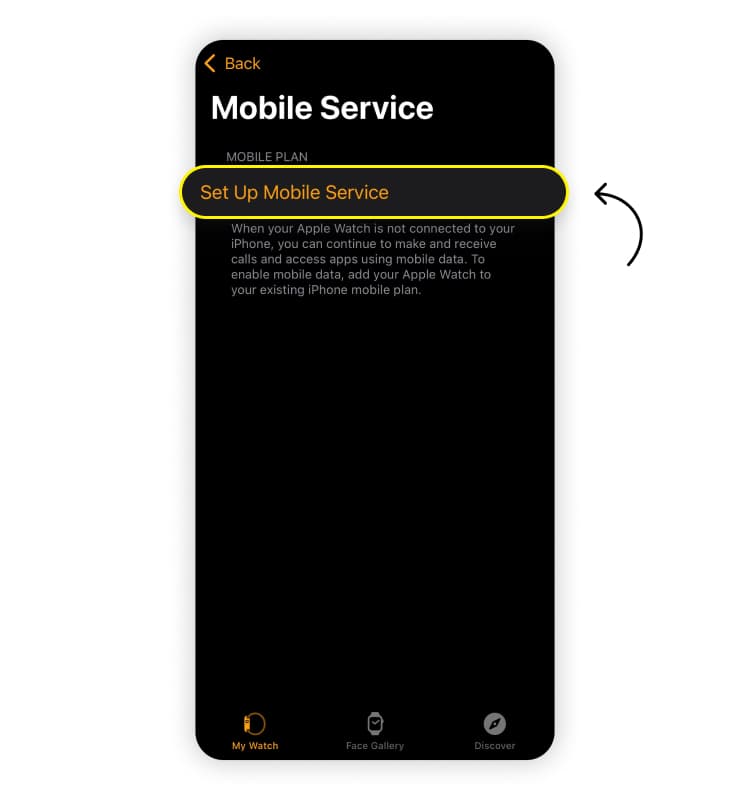
Follow the onscreen steps provided by your carrier. This may include logging in to your account and confirming your plan details.
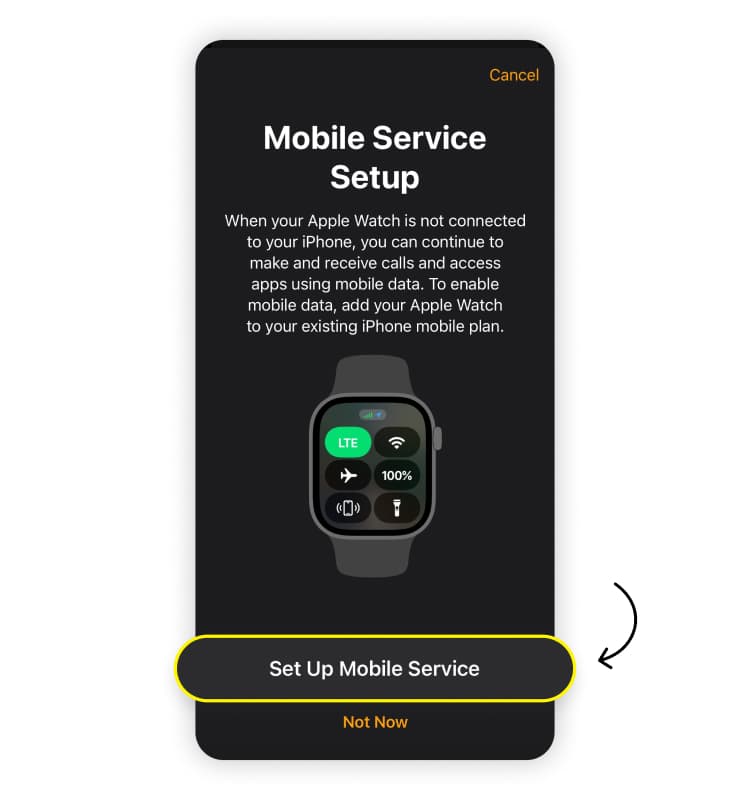
The setup process might take a few minutes while your carrier provisions the eSIM. Be patient. It’s like watching paint dry — boring, but worth it in the end.
Step 3: Verify cellular connection
Now let’s confirm everything’s working:
On an Apple Watch running watchOS 10 or later, press the side button to open the control center.
On older versions of watchOS, swipe up from the bottom of the watch face.
Look for the cellular icon. A green icon means your watch is connected to the network. A white icon means it’s ready but currently relying on Wi-Fi or your iPhone.
When you see that green signal, your Apple Watch is officially ready to handle calls, messages, and apps independently.
How to remove an eSIM on your Apple Watch
There may come a time when you might need to clear your Apple Watch’s eSIM. Maybe you’re upgrading, switching carriers, or handing it down to a family member. Here’s how to do it cleanly and avoid any surprise charges:
On your iPhone, open the Apple Watch app.
Go to the “My watch” tab and tap “Cellular.”
Tap the “i” icon next to the cellular plan you want to remove.
Select “Remove (your carrier's name here) plan” and confirm your choice.
This action wipes the eSIM profile from your Apple Watch. It’s like handing over a clean slate to the next owner or preparing your watch for its next adventure with a new plan.
How to move an eSIM to a new Apple Watch
Upgrading to a new Apple Watch means your cellular connectivity doesn’t have to skip a beat. When you unpair your old watch, your iPhone will ask if you want to keep your current cellular plan. Be sure to select “Keep plan” so all the necessary details remain tied to your phone.
Next, pair your new Apple Watch:
Open the Apple Watch app on your iPhone and start pairing.
Go to “My watch” > “Cellular” or “Mobile service.”
Tap Set up cellular and follow your carrier’s onscreen steps to activate the plan.
If the plan doesn’t transfer automatically, contact your carrier for assistance. They’ll update the details on their end to restore full cellular connectivity.
In just minutes, your new Apple Watch will be ready to make calls, send texts, and receive notifications without your phone nearby.
Saily and Apple Watch eSIMs: What travelers need to know
Saily offers data-only eSIMs for iPhones, making it easy to skip roaming fees and stay connected wherever life takes you. But there’s an important distinction: Saily does not offer an eSIM for Apple Watch. This isn’t a limitation of Saily, since Apple Watch eSIMs rely on your phone number and are configured through your mobile network provider.
If you want to enable Apple Watch cellular features like making calls, sending messages, and receiving notifications without your iPhone nearby, you’ll need to contact your carrier. It will help set up a compatible plan and activate it on your watch.
Saily remains an excellent solution for iPhone users, offering eSIM plans for over 200 destinations. And while your Apple Watch can’t use a Saily eSIM directly, it will still piggyback on your iPhone’s connection when within Bluetooth range for any feature that needs mobile data. Plus, if you enable a personal hotspot on your iPhone, your Apple Watch can stay connected over Wi-Fi as well!
To make sure your iPhone is fully ready for international travel, read our guide to using iPhones internationally.

Need an eSIM app with 24/7 customer support?
Enjoy stress-free mobile data with Saily.
FAQ


Karolis moves between digital worlds and distant horizons with the same intent. Drawn not by destinations but by a kind of gravitational longing: for a peak on the horizon, for a sense of being part of some forgotten story or road. A single backpack, his favorite gaming device of the month, and a stable connection for the odd grunge playlist are all he needs to ride off into that blood-red sunset.
Articoli correlati
