


Main navigation
How to install an eSIM on an iPhone: eSIM activation on your iOS device
You can either install an eSIM on your iPhone by scanning a QR code provided by an eSIM carrier, manually entering an activation code and SM-DP+ address, or downloading an eSIM app and purchasing a travel data plan. For all three methods, you’ll need a stable network connection (one that won’t cut out halfway through). Though installation should be smooth sailing, some issues may come up — we’ll cover how to troubleshoot eSIM installation on your iPhone.


Table of Contents
What is an eSIM on an iPhone?
An eSIM is a built-in virtual SIM card that allows you to connect to cellular networks in your home country or abroad without needing a physical SIM card. With an eSIM, you can activate a mobile data plan, switch carriers, and manage multiple SIM profiles without having to swap physical SIM cards. eSIMs are an especially popular choice for travelers looking for an affordable and convenient way to get internet access without drowning in roaming charges or wasting precious time searching for a traditional SIM card. You can purchase a travel eSIM through an app like Saily.
What do you need to install an eSIM on an iPhone?
In order to install an eSIM onto your iPhone, you’ll need to make sure you have the following:
An eSIM-compatible iPhone. All iPhone models from the XS/XR onward support eSIM technology. However, some iPhones manufactured and sold in certain countries, such as mainland China, won’t support eSIMs. For more information, read our article on iPhones with eSIM capabilities.
A carrier-unlocked iPhone. If you plan on using an eSIM while traveling, you’ll need to make sure that your iPhone is carrier unlocked (i.e., able to connect to cellular networks outside of your home country).
A data plan. An eSIM won’t work if you don’t have a mobile data plan to accompany it. You can purchase a monthly data plan from your network provider or you can get a temporary travel data plan from an eSIM service provider like Saily.
An eSIM app or an eSIM QR code. If you purchase an eSIM plan through an app, you’ll immediately receive a prompt to start the eSIM installation process. Alternatively, your eSIM provider might send you a QR code via email for you to scan and install your eSIM.
How to install an eSIM on your iPhone
As long as your iPhone is eSIMcompatible (if you have an iPhone XS/XR or a later model), you’ll have three options for installing an eSIM: 1) Scanning a QR code from your network provider, 2) manually entering the activation code and SM-DP+ address, or 3) downloading an eSIM app.
Method #1: QR code installation
To install an eSIM onto your iPhone from a QR code, follow these steps:
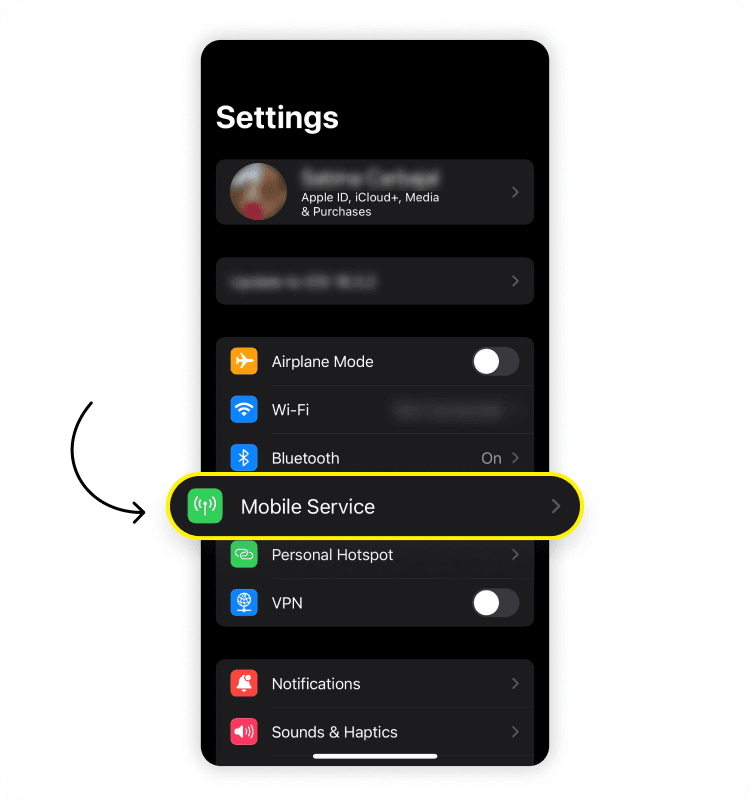
Go to “Settings,” then “Mobile service” or “Cellular” (depending on your iPhone’s language settings).
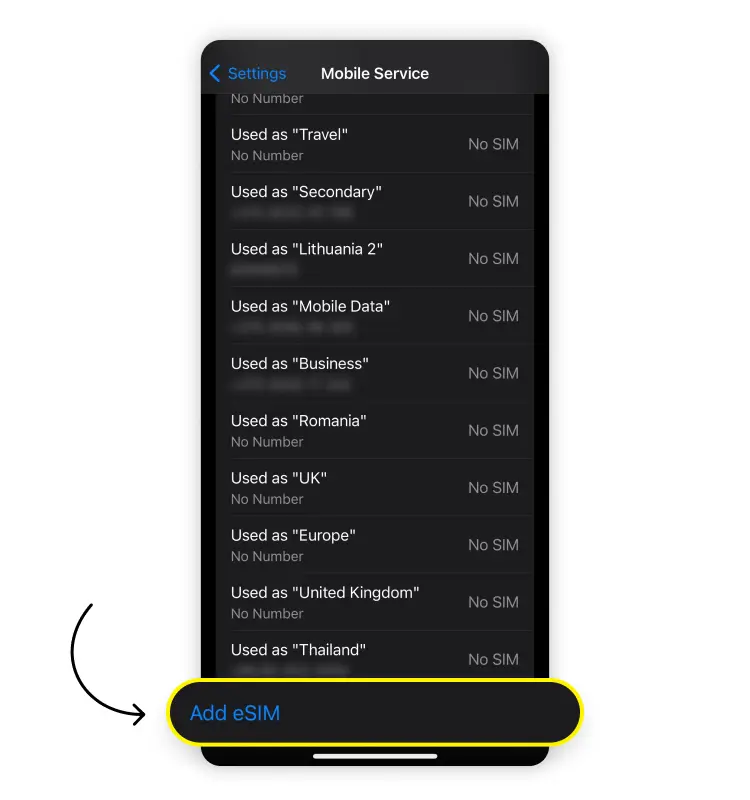
Under your list of SIMs, tap “Add eSIM.”
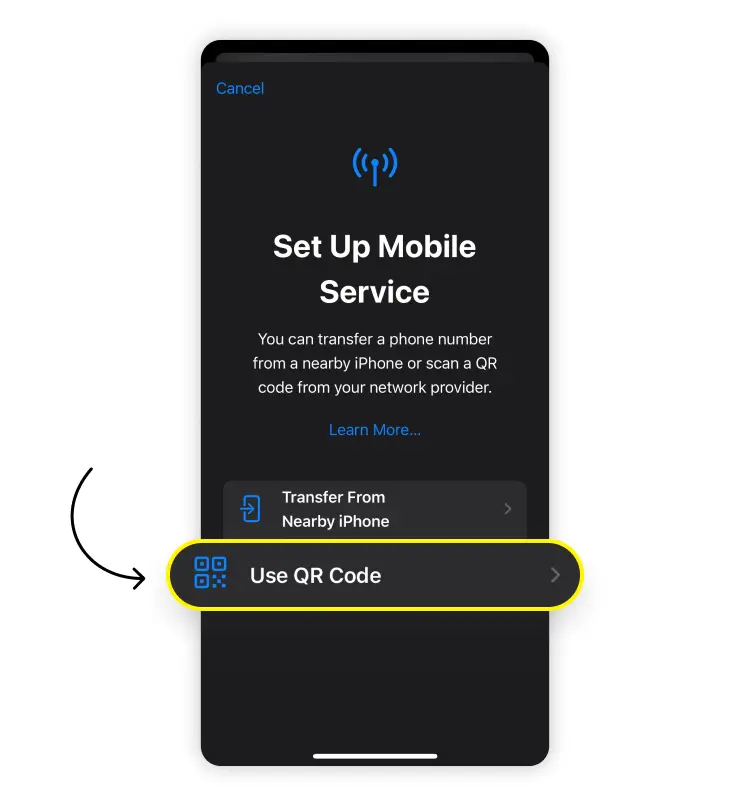
Select “Use QR code.”
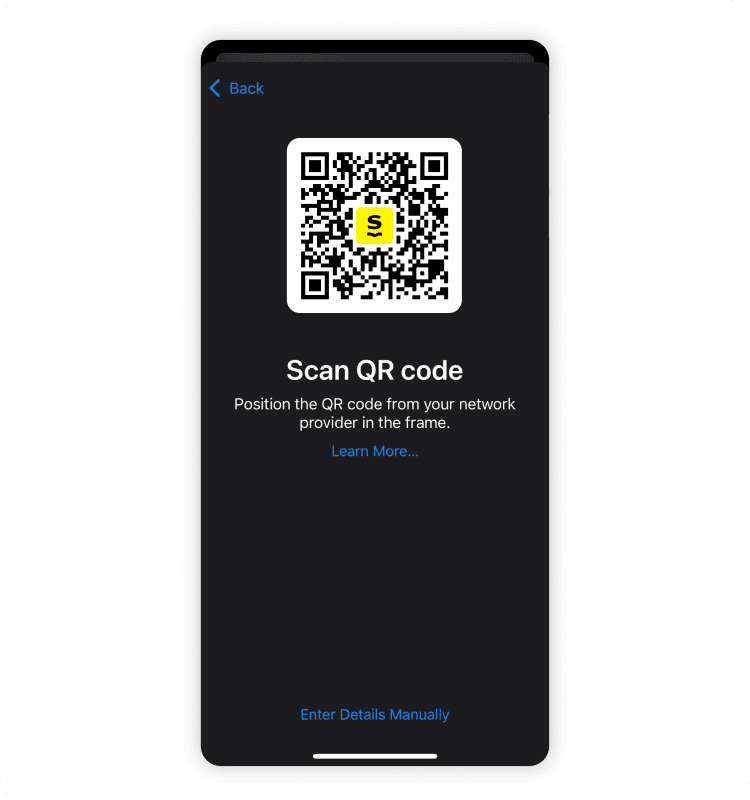
Using your iPhone’s camera, scan the QR sent to you by your network provider.
Method #2: Manual installation
To manually install an eSIM onto your iPhone, follow these steps:
Go to “Settings,” then “Mobile service.”
Under your list of SIMs, tap “Add eSIM.”
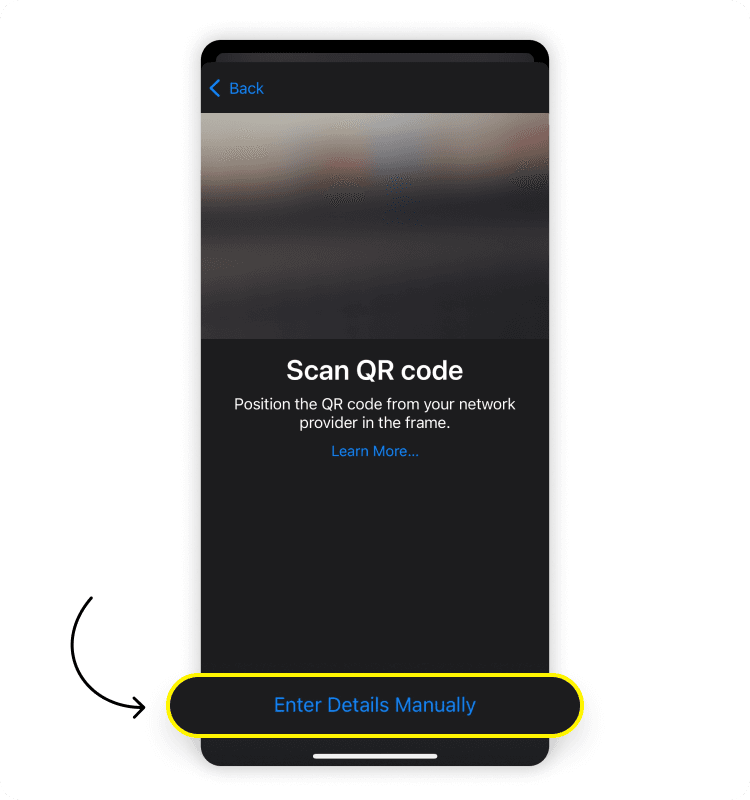
Select “Use QR code,” then “Enter details manually” at the bottom of the screen.
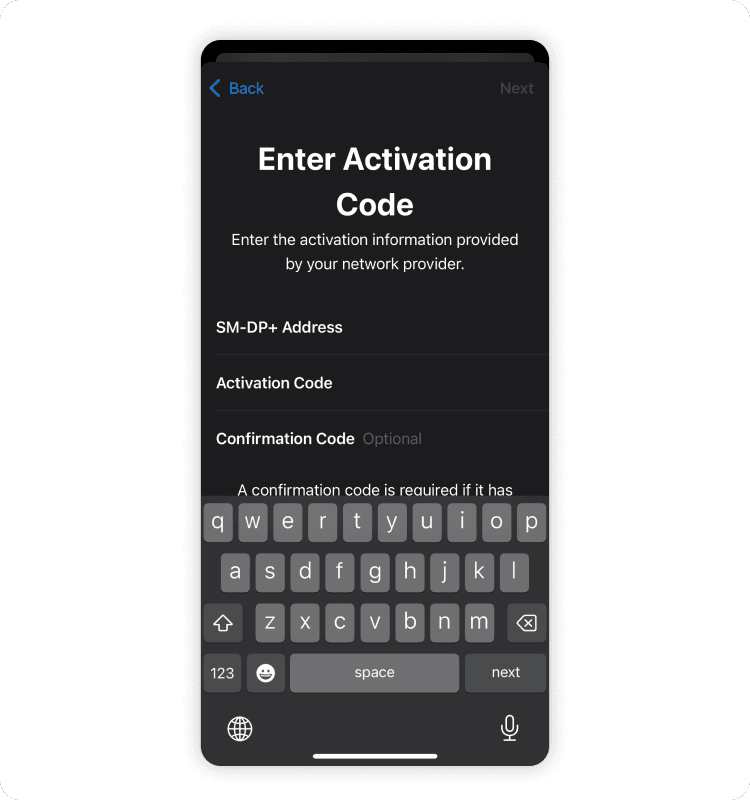
Enter the SM-DP+ address and activation code sent to you by your network provider. Some providers also require a confirmation code.
Method #3: Installation via an eSIM app (Saily)
To install an eSIM onto your iPhone via the Saily eSIM app, follow these steps:
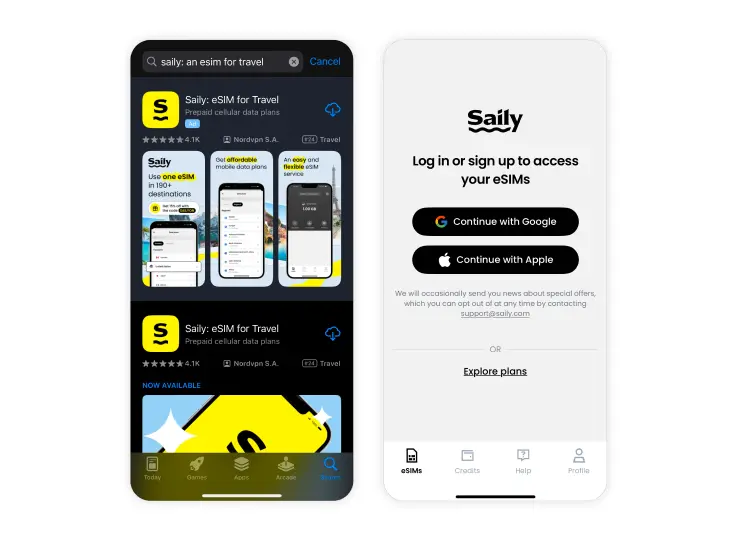
Download the Saily eSIM app and log in or sign up.
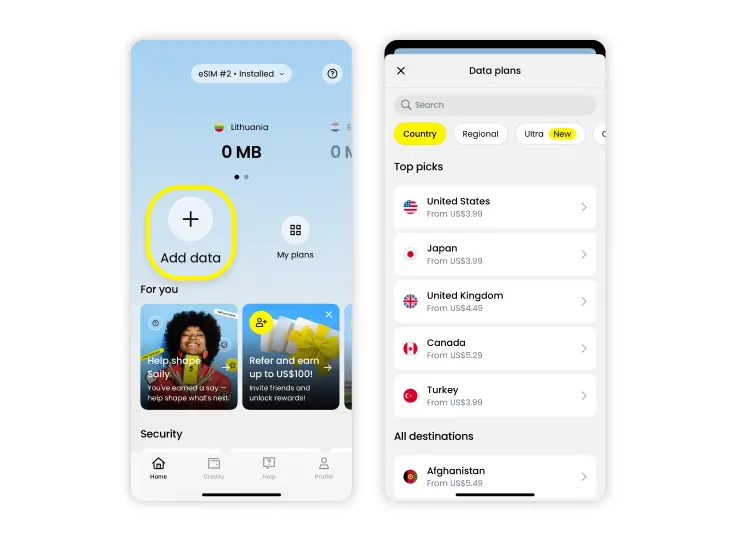
Tap “Add data” and search for the destination you’re traveling to.
Choose a mobile data plan that works best for your trip and go to the checkout page.
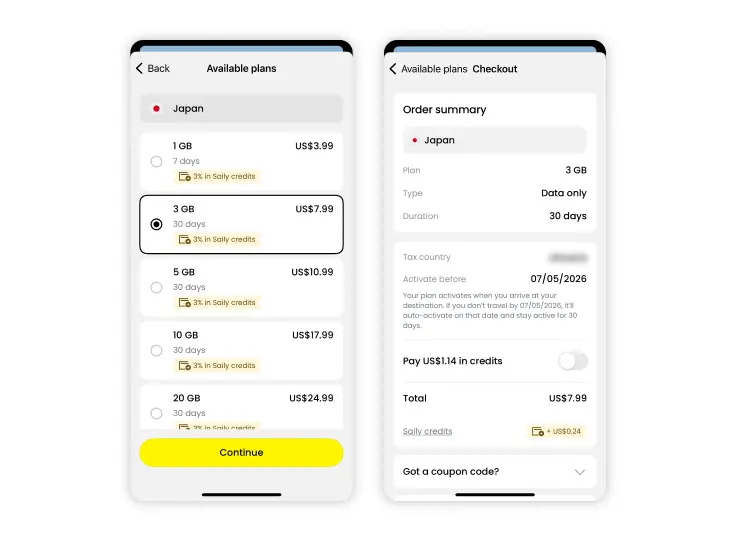
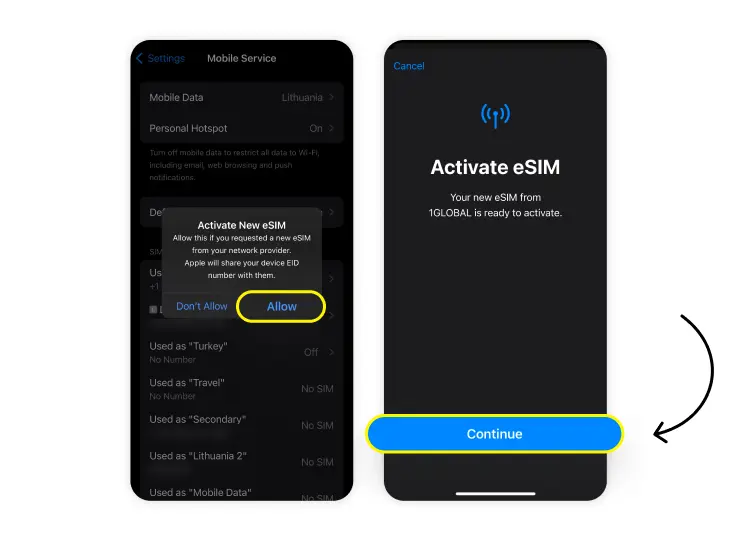
Once you’ve purchased your eSIM plan, tap “Install eSIM.” Make sure you have a stable Wi-Fi connection during eSIM installation.
You’ll be redirected to a pop-up in your settings. When asked about activating your new eSIM, tap “Allow.” When you get another prompt to activate your eSIM from Webbing, select “Continue.”
Within a few minutes, your eSIM will be installed — tap “Done.” You’ll be redirected to your list of SIM profiles. The default label for your new eSIM might be “Primary,” but we suggest labeling the eSIM or SIM card you use at home as “Primary” and renaming your travel eSIM.
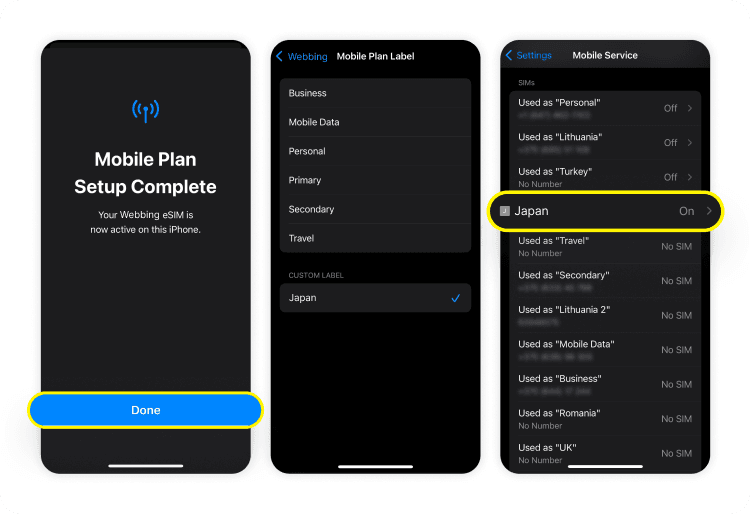
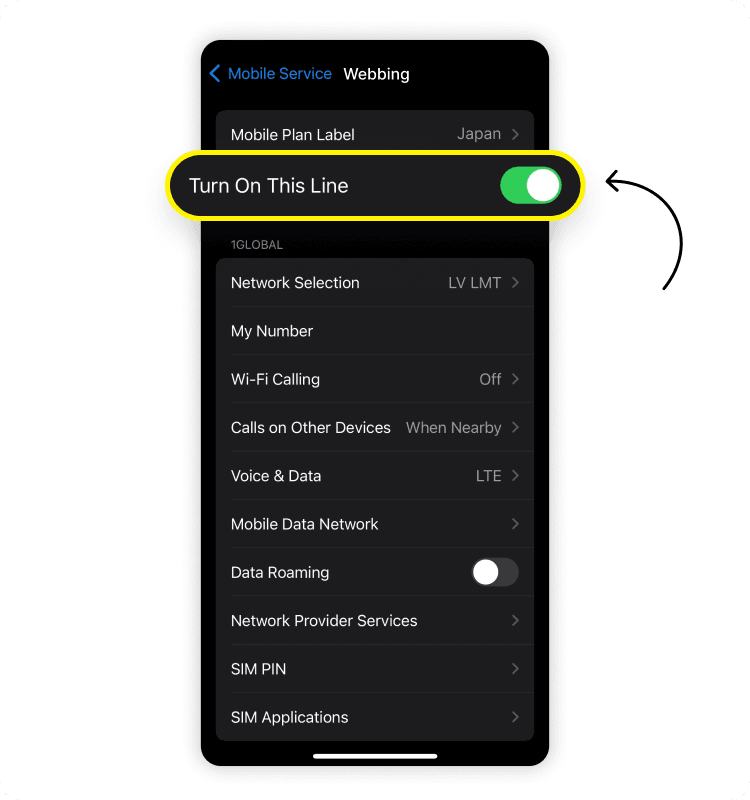
Ensure that the switch beside “Turn on this line” is on for your mobile data plan. If this setting is enabled, your plan will activate automatically when you arrive at your travel destination.
Please note that eSIM installation instructions will vary depending on which eSIM app you use. If you’re using the Saily eSIM app and you’ve followed these steps, you should have reliable internet access in no time! You can double-check that your eSIM is installed and activated in your phone’s settings by following the instructions below.
How to check if your eSIM is activated on your iPhone
To check if the eSIM is activated on your iPhone, go to “Settings,” and then “Mobile service” or “Cellular” (the name of the setting depends on where you’re located). Here, you’ll see a list of your SIM profiles — select the eSIM you’ve just installed. Make sure you’ve turned on your eSIM by toggling the switch beside “Turn on this line” and that the switch beside “Data roaming” is on.
To confirm that your mobile data is up and running, try opening an app that requires the internet, like Instagram or Safari. And voilà! If something went wrong along the way, you may need to do some simple troubleshooting to install an eSIM on your iPhone.
Curious about how to activate an eSIM on an Apple Watch? We’ve got a guide for that too!
Install an eSIM on an iPhone: Troubleshooting tips
Though activating an eSIM on your iPhone should be straightforward, the world of IT is still imperfect. If you’re experiencing issues with installing an eSIM on your iPhone, some of the culprits could be:
Carrier compatibility issues.
Outdated iOS versions.
eSIM account issues.
If you’re stuck on how to set up an eSIM on an iPhone:
Make sure that your phone has no carrier lock. Some network carriers lock phones to their cellular network. You can check if your iPhone is unlocked by going to “Settings” > “General” > “About.” If you see “No SIM restrictions” next to “Network provider lock,” yipee! Your phone is unlocked and you can follow the next steps to get an eSIM. However, if you see “SIM locked,” you’ll need to contact your carrier to unlock your iPhone.
Ensure that you’ve only scanned your QR code once. Many QR codes provided by a network provider can only be scanned once, unless otherwise specified.
Confirm that your device supports eSIMs. From the “Settings” app, go to “Mobile service” or “Cellular” (depending on your iPhone’s language settings). Here, you’ll see a list of your SIM profiles. If you can find the “Add eSIM” button at the bottom of the list, your iPhone will support eSIM technology. You can also check out Saily’s list of eSIM-supported devices.
Make sure your iOS version is up to date. Many of us are guilty of putting off that software update — that little red circle with the “1” just ends up fading into the background. But this may be the reason your eSIM is not working on your iPhone.
Check the payment method on your eSIM app. Missing or incorrect details in your account may be what’s stopping eSIM installation.
Try restarting your iPhone. The tried and true solution to IT issues is, of course, restarting your device. It’s worth a shot if all else fails.
If you’ve scanned a QR code to install an eSIM and get an error message:
Make sure your QR code isn’t expired since some QR codes have a time limit. If you’ve been putting off eSIM installation and are just scanning your QR code now, the time limit may have passed. Check with your carrier to see if this is the case, and if so, get a new code.
Ask your carrier if the QR code is correct, too. Human error happens to the best of us, and someone might have given you the wrong code.
If you don’t want to jump on a call with a customer service rep just yet, you could also try manually entering the SM-DP+ address and activation code provided by your carrier.
If absolutely nothing works, you can reach out to Apple Support, your network carrier, or — if you’ve gotten an eSIM from a service like Saily — contact its customer support.
Further reading:

Need an eSIM app with 24/7 customer support?
Enjoy stress-free mobile data with Saily.
FAQ
To switch between your SIM card and eSIM profiles, you’ll need to go to “Settings” > “Cellular” or “Mobile service.” Under your list of SIMs, you can select which SIM or eSIM profile you’d like to enable. To convert your SIM card into an eSIM, reach out to your network provider.
Yes, you can install up to eight eSIM profiles or more on the iPhone 13, 14, 15, 16, and 17 series. If your iPhone has a dual-SIM functionality, you’re actually able to use two eSIMs at once and in turn, two mobile data plans. In other words, you can only flip the “On” switch on a total of two eSIMs at a time, and the remaining six will be “napping” in the meantime.
Installing an eSIM after your iPhone has been factory reset shouldn’t be much different than installing an eSIM under normal circumstances. Start off by following the instructions to set your iPhone up, including connecting to a Wi-Fi network. Then follow the instructions for installing an eSIM on your iPhone.
But let’s rewind a bit — you can also reset an iPhone without losing an eSIM. During a factory reset, you’re given two options for the fate of your eSIM — 1) keep your eSIMs and erase your data, or 2) delete your eSIMs and erase your data. To make life easier, we suggest always going for the first option since you can also deactivate an eSIM later on.
Go to “Settings,” and then either “Mobile service” or “Cellular” (the name depends on the language setting of your iPhone). Here, you’ll see a list of all the SIM cards and eSIMs on your phone. Select the one you want to deactivate and toggle the “Turn on this line” switch until it’s off. If you want to get rid of the eSIM altogether, scroll down to “Delete eSIM.” Even after you delete an eSIM, you’ll still be able to see the ghost of your eSIM in the list of SIMs with “No SIM” written beside it. If you try selecting your dead eSIM, you’ll get a message saying that this mobile plan is no longer available.

Installing an eSIM on your iPhone typically takes 1 to 5 minutes, but it ultimately depends on the speed and stability of your internet connection. If you have a strong and stable connection, you should be able to install an eSIM in less than a minute.

Stay online, wherever life takes you
Enjoy secure and effortless internet access with the Saily eSIM app.
Related articles
